How to record system audio on a Mac
"System audio" is the sound your Mac is playing — the thing coming out of your speakers, rather than the thing going into your microphone. macOS keeps the two apart, which is why an ordinary audio recorder captures a room and not a browser tab. Here is what actually works, in about two minutes.
Get RedLight
Record any sound your Mac plays. Free to try — one purchase unlocks unlimited recording, forever.
Why your Mac won't just do it
Every audio recorder on macOS asks Core Audio for an input device: a microphone, an interface, a USB mixer. The mix your Mac is playing isn't an input, so it never appears in that list. For years the only way round it was a virtual audio driver — software that pretends to be a sound card, which you route your output through and record from the other end. That works, but it means installing a system extension, remembering to switch your output back, and often not hearing anything while you record.
macOS 14.4 changed it. Core Audio gained a process tap: a supported way for an app to listen to what another app — or the whole system — is playing, without touching your output routing. RedLight is built on that API. Nothing is installed into macOS, your sound keeps coming out of the device it already used, and what you record is exactly what you hear.
Recording it, step by step
With RedLight from the Mac App Store.
- Open RedLight and choose a folder
It's sandboxed and ships with no default save location, so the first thing it asks for is somewhere to write — your Desktop is fine. Click Change… near the bottom of the window.
- Allow the permission macOS asks for
macOS gates system-audio capture behind the Microphone permission, whether or not you ever record a microphone. Click Allow. If you dismissed it, turn RedLight on under System Settings → Privacy & Security → Microphone and relaunch.
- Start the sound first
RedLight records what is already playing. Start the video, call or app, at a normal listening volume.
- Press Start recording
Or
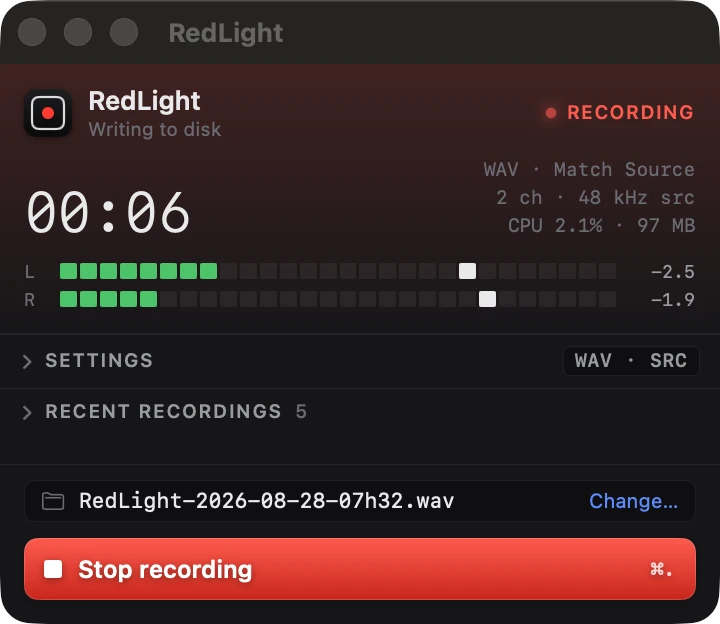
⌘R, or Record in the menu bar. The stereo meters move as sound arrives — that's your confirmation it's being captured. Press Stop and the file is finalised on disk.
What you get, and in what format
RedLight writes WAV by default at the source's own sample rate — no resampling, no lossy pass. If you want something else:
- Uncompressed: WAV, AIFF, CAF
- Lossless compressed: ALAC, FLAC — around half the size, bit-for-bit identical when decoded
- Compressed: AAC, 64–320 kbps, for anything headed straight to the web
Bit depth is 16, 24 or 32-bit float; sample rate either follows the source or is fixed at 22.05, 44.1, 48, 88.2 or 96 kHz. Files are named by date and time — RedLight-2026-07-06-22h56.wav — and land in the folder you chose, where they're yours: no library, no proprietary container.
Adding your own voice
System audio alone captures everyone else in a call but not you. Turn Microphone on in Sources and RedLight mixes your voice in — or, set Record as to Separate File, writes it alongside as a second file of the same length so you can balance the two afterwards. Auto level handles the levels for you, measuring only while you're actually speaking.
Wear headphones when you do this, or your microphone records your speakers as well and everything lands twice. The full microphone walkthrough is here.
Leaving it running
For anything long or unattended, three settings matter. Chunking rolls to a new file every N minutes or N megabytes, so a day of capture isn't one unmanageable file. Silence handling can drop the dead air out of a continuous file, or start a new file each time sound resumes. Automatic clean-up deletes recordings past an age or once the folder passes a size cap — and only ever touches RedLight's own RedLight-* files, never the one being recorded.
Turn on Open at login and RedLight is in the menu bar from the moment you sit down, one click from a take.
Questions
Do I need BlackHole, Soundflower or Loopback as well?
No. Those are virtual audio drivers, and RedLight does not use one — it uses the Core Audio process tap added in macOS 14.4. Nothing is installed into the system and your output routing is left alone. More on what changed.
Can I still hear the audio while it records?
Yes. A tap listens to the mix on its way out; it does not divert it. Your output device keeps playing exactly as before, at the same volume.
Why does it ask for microphone permission to record system audio?
Because macOS requires it: system-audio capture sits behind the Microphone TCC prompt whether or not a physical microphone is involved. Granting it does not record your voice — only the Microphone switch in Sources does that.
Can I record just one app instead of everything?
Yes. In Sources, choose Include and pick the processes you want, or Exclude to capture everything except the ones you name — a common way to keep notification sounds out of a recording.
Is the recording lossless?
It can be. WAV, AIFF, CAF, ALAC and FLAC are all lossless, at up to 32-bit float and 96 kHz. AAC is there when you want a small file instead.
What does it cost?
RedLight is free, with recordings capped at four minutes each. A single in-app purchase, RedLight Unlimited, removes the cap for good — it is not a subscription, and it lifts mid-recording.
Related guides
Other things people record on a Mac.
Still stuck?
The full support page has the setup walkthrough, every setting explained, and the common fixes. Or email support@kernowlabs.com with your macOS version — we reply within two business days.
You are responsible for recording only audio you have the right to capture, and for obtaining any consent required where you are.