Support
Help with RedLight — recording system audio on your Mac
RedLight records the sound playing on your Mac — any app, call, or audio you create — and, if you want it, your own voice through the microphone. No virtual audio driver, no loopback cable. This page walks you through everything, step by step. No technical knowledge needed.
Get RedLight
Record any sound on your Mac, and your own voice with it. Free to try — one purchase unlocks unlimited recording, forever.
Setting up the first time
Two minutes, once. After this you can just open and record.
- Open RedLight
Find it in your Applications folder (or Launchpad) and click to open. The main window appears with a large red button at the bottom.
- Allow it to record when macOS asks
The first time you record, macOS shows a permission box. Click Allow (or OK). This is macOS keeping you in control — RedLight can't capture any sound until you say yes.
- If you clicked the wrong button by mistake
No problem. Open the Apple menu → System Settings → Privacy & Security, find RedLight under the audio recording permission (Microphone), switch it on, then quit RedLight and open it again.
Making a recording
The key thing to know: RedLight records whatever is already playing through your Mac. So start the sound first.
- Choose where the file should go
Near the bottom of the window you'll see a file name and a Change… link. Click it to pick a folder, such as your Desktop. RedLight needs a folder set before it can record.
- Start the sound you want to capture
Play the video, call, app, or instrument you want to record, at a normal listening volume. If nothing is playing, there's nothing for RedLight to hear.
- Click Start recording
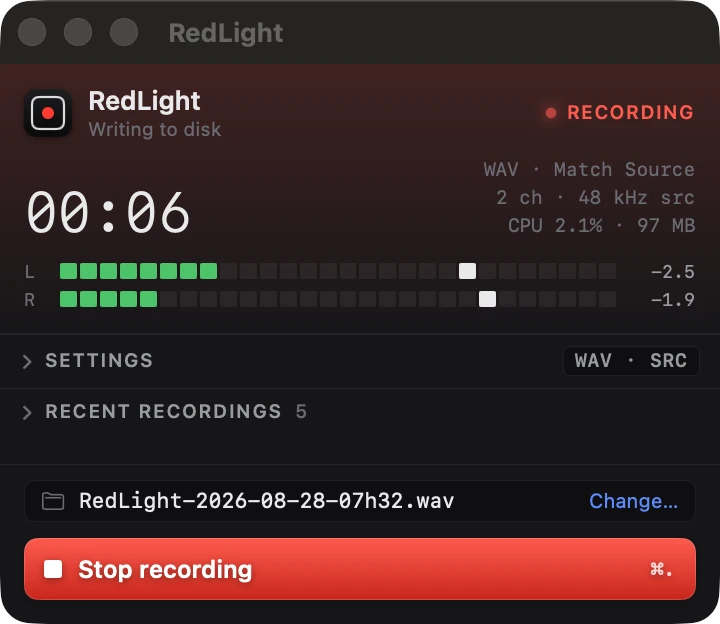
Press the big red Start recording button (or press
⌘R). The timer begins counting and the two bars in the middle move as sound comes through — that's how you know it's working. - Click Stop when you're done
The same button now says Stop. Click it, and your recording is saved automatically as a file.
Recording your own voice as well
New in version 1.1. RedLight can capture your microphone alongside the system audio — for calls, meetings, voice-overs and commentary. It stays off until you turn it on.
- Switch the microphone on
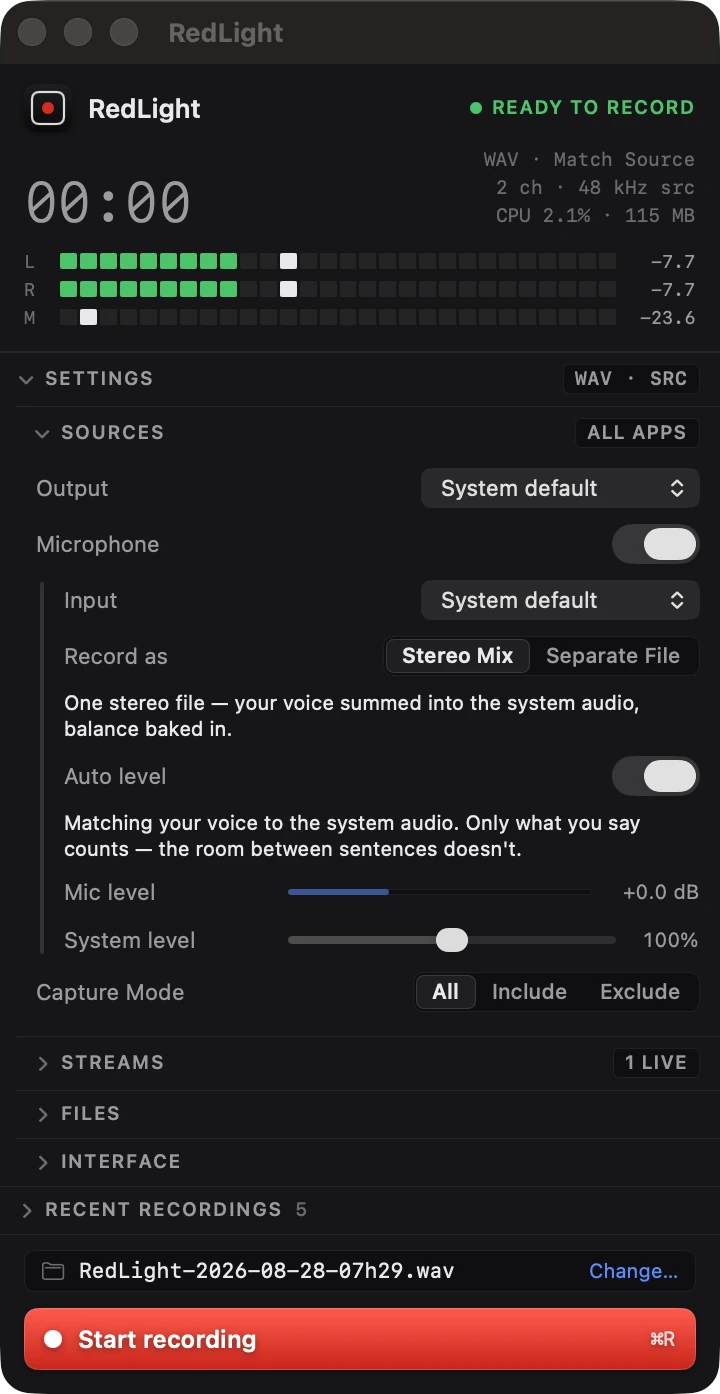
In the main window open Sources and turn Microphone on — or click Microphone in the menu bar, which reads Enabled or Disabled at a glance. Choose which input to use under Input, or leave it on System default.
- Choose how it's saved
Record as → Stereo Mix writes one file with your voice summed into the system audio. Separate File writes two files of the same length — the system audio under the usual name, your microphone beside it ending in
-mic— so you can set the balance afterwards. - Let RedLight set the level, or set it yourself
Auto level is on to start with: it measures only while you're actually speaking, brings your voice up to a good level and balances it against the system audio when there is any — a quiet room is never lifted to meet it. Turn Auto level off and the Mic level fader is yours. System level sets how loud everything else sits under your voice.
- Wear headphones
Otherwise the microphone picks up your speakers too, and the system audio lands in the recording twice.
Finding and playing your recordings
Every recording is a normal audio file you fully own.
- Find the file
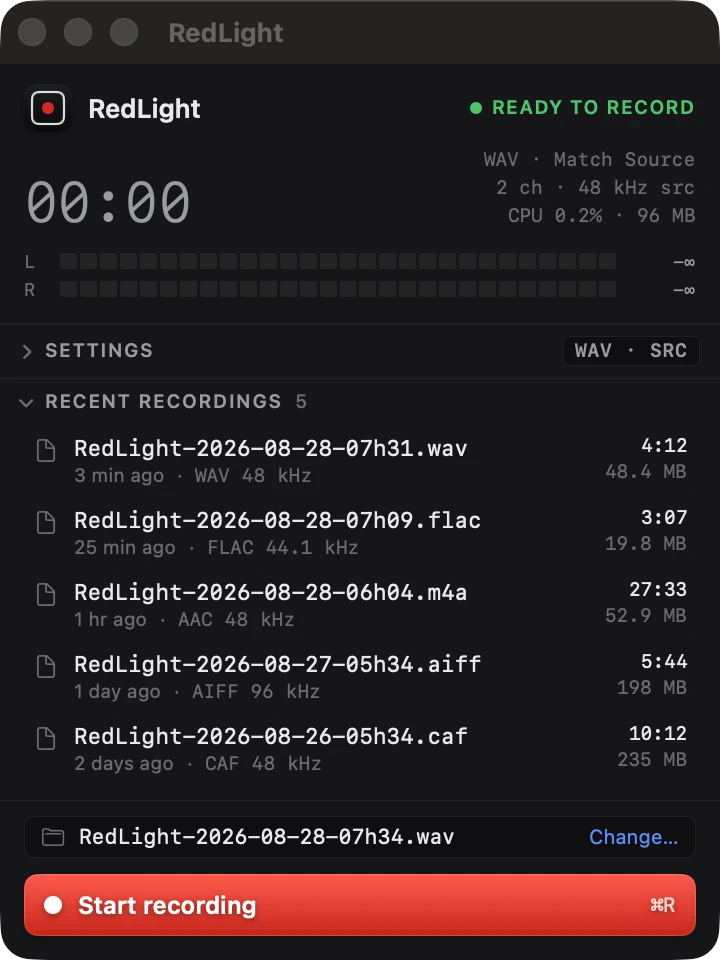
It's saved to the folder shown by the Change… link, and it also appears in the Recent Recordings list inside RedLight (the last 20). Files are named by date and time, for example
RedLight-2026-07-06-22h56.wav. - Play or reveal it
Double-click the file to open it in your Mac's built-in player, or use the Recent Recordings list in RedLight to play or reveal any past recording in the Finder with one click. A WAV file is a standard, high-quality format that plays in QuickTime, Music, and almost any audio app.
Handling silence
RedLight can deal with quiet gaps automatically. Choose the behaviour in Settings.
Do Nothing
The default. Records everything exactly as it plays, silence and all.
Concatenate — skip the dead air
When the audio goes quiet, RedLight pauses recording, then picks straight back up in the same file when sound returns. The quiet stretches are simply left out, so you get one continuous take with no gaps.
Split Files — one file per burst of sound
Each time silence falls, RedLight closes the current file; the next sound starts a fresh one. Great for capturing separate takes, clips, or tracks without stopping and starting by hand.
Choosing what to record
By default RedLight captures all the sound coming out of your Mac. In Settings you can instead record only chosen apps, or record everything except certain apps — handy for leaving out notifications or a music player while you capture a call.
Hands-free capture
RedLight can live in your menu bar and run without the main window. The menu does the everyday work: Record, Stop and a Microphone toggle reading Enabled or Disabled — those three leave the menu open when you click them, so you can arm the mic and start recording without reopening it — plus a status line, the recordings folder, and the full window.
Two optional settings make it fully hands-off:
Open at login
Starts RedLight in the menu bar automatically when you log in. (RedLight needs to be in your Applications folder for this.)
Record on launch
Begins a recording the moment RedLight opens. Turn on Open at login as well and every session is captured from the first moment you sit down. You'll need a save folder set first.
Microphone and levels
System audio is captured whether or not the microphone is on — the microphone is an extra, and it's off by default. Everything below lives in Sources, under the Microphone switch.
Input
Which microphone joins the mix. System default follows whatever input macOS is using.
Record as — Stereo Mix or Separate File
Stereo Mix (the default) sums your voice into one stereo file, balance baked in. Separate File keeps the system audio clean and writes the microphone alongside it as a second file ending -mic, the same length, so every level decision stays changeable in post.
Auto level
On by default. It sets the microphone level for you — up to a good level on its own, or matched to the system audio when there is any — measuring only while you speak, with a limiter to catch peaks. Turn it off to drive the fader yourself; the level is shown either way.
Mic level and System level
How loud your voice and the system audio sit against each other. Both apply live, so you can adjust while recording. If your voice is quiet, pull the system level down rather than pushing the mic up — there's no limiter on the system side, so boosting it can clip.
Formats and quality
RedLight records to WAV by default — a standard, high-quality format that plays in QuickTime, Music, and almost any app, and drops straight into a DAW. In Settings you can choose a different format and quality to suit your workflow:
• Uncompressed: WAV, AIFF, CAF
• Lossless compressed (smaller, no quality loss): ALAC, FLAC
• Compressed (smallest files): AAC, with a choice of bitrates
You can also set the bit depth (16, 24, or 32-bit float) and either match your source's sample rate or pick your own.
Automatic housekeeping
For long or unattended sessions, RedLight can keep things tidy on its own. Both features are off by default — turn them on in Settings only if you want them.
Split long recordings automatically
RedLight can break a long session into a series of files by time (e.g. every 60 minutes) or by size (e.g. every 500 MB), so you're never left with one giant file.
Clean up old recordings automatically
RedLight can remove older recordings once they pass a limit you set — either an age (older than N hours) or a total folder size (delete the oldest until the folder is back under your cap). Useful for a machine that records around the clock.
RedLight-…) in your chosen folder, and never the one it's currently recording. It's off until you enable it — if you want to keep everything, simply leave it off.RedLight Unlimited
The free version records up to four minutes at a time. One purchase removes that limit forever.
Why did my recording stop at four minutes?
That's the free limit — each recording session stops after four minutes. Your recording up to that point is still saved.
How do I unlock unlimited recording?
Click Unlock Unlimited in the app and confirm the purchase with your Apple ID. It's a single one-time payment — not a subscription, and it never expires.
I paid before, on this Mac or another one.
Click Restore Purchase in the app while signed in to the same Apple ID you originally bought with. Your unlimited recording comes straight back at no extra cost. If it doesn't, email us and we'll sort it out.
Troubleshooting
The most common hiccups and how to fix them.
My recording is silent / the bars don't move.
Two usual causes. First, make sure sound is actually playing on your Mac while you record — try a video to test. Second, check the permission is on: Apple menu → System Settings → Privacy & Security → Microphone (or Screen & System Audio Recording) → turn RedLight on, then quit and reopen the app.
Recording seems to pause or stop during quiet parts.
That's silence handling doing its job. If Concatenate or Split Files is on, RedLight deliberately pauses through silence. To capture everything, including quiet passages, open Settings and set silence handling to Do Nothing.
Some of my older recordings are gone.
If you switched on automatic cleanup, RedLight removes older recordings once they pass the age or folder-size limit you set. It only ever removes RedLight's own recordings in your chosen folder. To keep everything, open Settings and turn automatic cleanup off.
The record button won't start.
Usually this means either no save folder is set (click Change… to pick one) or permission hasn't been granted yet (see the first question). Sort those, then relaunch RedLight.
I can't find my saved file.
Open RedLight and look at the Recent Recordings list, or click Change… to see which folder recordings are being saved to. You can set this to somewhere easy to find, like your Desktop.
macOS says the app is from an unidentified developer.
If you downloaded RedLight from the Mac App Store you won't see this. If you do, right-click the app icon and choose Open, then click Open again to confirm.
Does RedLight record my microphone?
Not unless you ask it to. The Microphone switch in Sources is off to start with, and system audio is captured either way. Turn it on for calls and meetings where your own voice should be in the recording.
Why does RedLight need Microphone permission just to record system audio?
That's macOS, not RedLight: system-audio capture is gated behind the Microphone permission whether or not a physical microphone is ever used. Granting it doesn't record your voice — only the Microphone switch in Sources does that.
My voice is too quiet or too loud next to the system audio.
Leave Auto level on and it balances your voice against the system audio for you, measuring only while you speak. To set it by hand, turn Auto level off and use the Mic level fader — and if your voice is quiet, pull System level down rather than pushing the mic up, which can clip. In Separate File mode the two are written as separate files, so you can rebalance them afterwards.
Everything sounds muffled when I use my Bluetooth headset.
Turning the microphone on puts a Bluetooth headset into hands-free mode, which is 16 kHz mono in both directions — and if you listen through that same headset, macOS drops the system audio to match before RedLight ever sees it. It's a limit of Bluetooth Classic. Listen on another output, or use a wired or USB microphone.
There's a second file ending in “-mic”.
That's your microphone, kept on its own because Record as is set to Separate File. The main file is the system audio alone, and the two are the same length. Choose Stereo Mix in Sources if you'd rather have one combined file.
My own voice is recorded twice, or echoes.
Your microphone is hearing your speakers as well as you. Wear headphones while recording with the microphone on.
Still stuck?
Email us with your macOS version and a sentence about what happened — see the contact details below. We read every message.
Step-by-step guides
The jobs people actually open RedLight for.
Contact us
Real people, based at Kernow Labs. We reply within two business days.
support@kernowlabs.comPlease include your macOS version (Apple menu → About This Mac) and a short description of the problem. It helps us help you faster.
Privacy & responsibility
RedLight collects no data. Your recordings stay on your Mac, and nothing is ever sent to us or anyone else — RedLight works fully offline.
You are responsible for recording only audio you have the right to capture, and for obtaining any consent required where you are.